Pinterest 247k Followers 32.1k Followers
Where Photography Meets Creativity
Afghanistan (AFN ؋)
Åland Islands (EUR €)
Albania (ALL L)
Algeria (DZD د.ج)
Andorra (EUR €)
Angola (USD $)
Anguilla (XCD $)
Antigua & Barbuda (XCD $)
Argentina (ARS $)
Armenia (AMD դր.)
Aruba (AWG ƒ)
Ascension Island (SHP £)
Australia (AUD $)
Austria (EUR €)
Azerbaijan (AZN ₼)
Bahamas (BSD $)
Bahrain (USD $)
Bangladesh (BDT ৳)
Barbados (BBD $)
Belarus (USD $)
Belgium (EUR €)
Belize (BZD $)
Benin (XOF Fr)
Bermuda (USD $)
Bhutan (USD $)
Bolivia (BOB Bs.)
Bosnia & Herzegovina (BAM КМ)
Botswana (BWP P)
Brazil (USD $)
British Indian Ocean Territory (USD $)
British Virgin Islands (USD $)
Brunei (BND $)
Bulgaria (BGN лв.)
Burkina Faso (XOF Fr)
Burundi (BIF Fr)
Cambodia (KHR ៛)
Cameroon (XAF CFA)
Canada (CAD $)
Cape Verde (CVE $)
Caribbean Netherlands (USD $)
Cayman Islands (KYD $)
Central African Republic (XAF CFA)
Chad (XAF CFA)
Chile (USD $)
China (CNY ¥)
Christmas Island (AUD $)
Cocos (Keeling) Islands (AUD $)
Colombia (USD $)
Comoros (KMF Fr)
Congo - Brazzaville (XAF CFA)
Congo - Kinshasa (CDF Fr)
Cook Islands (NZD $)
Costa Rica (CRC ₡)
Côte d’Ivoire (XOF Fr)
Croatia (EUR €)
Curaçao (ANG ƒ)
Cyprus (EUR €)
Czechia (CZK Kč)
Denmark (DKK kr.)
Djibouti (DJF Fdj)
Dominica (XCD $)
Dominican Republic (DOP $)
Ecuador (USD $)
Egypt (EGP ج.م)
El Salvador (USD $)
Equatorial Guinea (XAF CFA)
Eritrea (USD $)
Estonia (EUR €)
Eswatini (USD $)
Ethiopia (ETB Br)
Falkland Islands (FKP £)
Faroe Islands (DKK kr.)
Fiji (FJD $)
Finland (EUR €)
France (EUR €)
French Guiana (EUR €)
French Polynesia (XPF Fr)
French Southern Territories (EUR €)
Gabon (XOF Fr)
Gambia (GMD D)
Georgia (GEL ₾)
Germany (EUR €)
Ghana (USD $)
Gibraltar (GBP £)
Greece (EUR €)
Greenland (DKK kr.)
Grenada (XCD $)
Guadeloupe (EUR €)
Guatemala (GTQ Q)
Guernsey (GBP £)
Guinea (GNF Fr)
Guinea-Bissau (XOF Fr)
Guyana (GYD $)
Haiti (USD $)
Honduras (HNL L)
Hong Kong SAR (HKD $)
Hungary (HUF Ft)
Iceland (ISK kr)
India (INR ₹)
Indonesia (IDR Rp)
Iraq (USD $)
Ireland (EUR €)
Isle of Man (GBP £)
Israel (ILS ₪)
Italy (EUR €)
Jamaica (JMD $)
Japan (JPY ¥)
Jersey (USD $)
Jordan (USD $)
Kazakhstan (KZT ₸)
Kenya (KES KSh)
Kiribati (USD $)
Kosovo (EUR €)
Kuwait (USD $)
Kyrgyzstan (KGS som)
Laos (LAK ₭)
Latvia (EUR €)
Lebanon (LBP ل.ل)
Lesotho (USD $)
Liberia (USD $)
Libya (USD $)
Liechtenstein (CHF CHF)
Lithuania (EUR €)
Luxembourg (EUR €)
Macao SAR (MOP P)
Madagascar (USD $)
Malawi (MWK MK)
Malaysia (MYR RM)
Maldives (MVR MVR)
Mali (XOF Fr)
Malta (EUR €)
Martinique (EUR €)
Mauritania (USD $)
Mauritius (MUR ₨)
Mayotte (EUR €)
Mexico (MXN $)
Moldova (MDL L)
Monaco (EUR €)
Mongolia (MNT ₮)
Montenegro (EUR €)
Montserrat (XCD $)
Morocco (MAD د.م.)
Mozambique (USD $)
Myanmar (Burma) (MMK K)
Namibia (USD $)
Nauru (AUD $)
Nepal (NPR Rs.)
Netherlands (EUR €)
New Caledonia (XPF Fr)
New Zealand (NZD $)
Nicaragua (NIO C$)
Niger (XOF Fr)
Nigeria (NGN ₦)
Niue (NZD $)
Norfolk Island (AUD $)
North Macedonia (MKD ден)
Norway (NOK kr)
Oman (USD $)
Pakistan (PKR ₨)
Palestinian Territories (ILS ₪)
Panama (USD $)
Papua New Guinea (PGK K)
Paraguay (PYG ₲)
Peru (PEN S/)
Philippines (PHP ₱)
Pitcairn Islands (NZD $)
Poland (PLN zł)
Portugal (EUR €)
Qatar (QAR ر.ق)
Réunion (EUR €)
Romania (RON Lei)
Russia (USD $)
Rwanda (RWF FRw)
Samoa (WST T)
San Marino (EUR €)
São Tomé & Príncipe (STD Db)
Saudi Arabia (SAR ر.س)
Senegal (XOF Fr)
Serbia (RSD РСД)
Seychelles (USD $)
Sierra Leone (SLL Le)
Singapore (SGD $)
Sint Maarten (ANG ƒ)
Slovakia (EUR €)
Slovenia (EUR €)
Solomon Islands (SBD $)
Somalia (USD $)
South Africa (USD $)
South Georgia & South Sandwich Islands (GBP £)
South Korea (KRW ₩)
South Sudan (USD $)
Spain (EUR €)
Sri Lanka (LKR ₨)
St. Barthélemy (EUR €)
St. Helena (SHP £)
St. Kitts & Nevis (XCD $)
St. Lucia (XCD $)
St. Martin (EUR €)
St. Pierre & Miquelon (EUR €)
St. Vincent & Grenadines (XCD $)
Sudan (USD $)
Suriname (USD $)
Svalbard & Jan Mayen (NOK kr)
Sweden (SEK kr)
Switzerland (CHF CHF)
Taiwan (TWD $)
Tajikistan (TJS ЅМ)
Tanzania (TZS Sh)
Thailand (THB ฿)
Timor-Leste (USD $)
Togo (XOF Fr)
Tokelau (NZD $)
Tonga (TOP T$)
Trinidad & Tobago (TTD $)
Tristan da Cunha (GBP £)
Tunisia (USD $)
Türkiye (USD $)
Turkmenistan (USD $)
Turks & Caicos Islands (USD $)
Tuvalu (AUD $)
U.S. Outlying Islands (USD $)
Uganda (UGX USh)
Ukraine (UAH ₴)
United Arab Emirates (AED د.إ)
United Kingdom (GBP £)
United States (USD $)
Uruguay (UYU $U)
Uzbekistan (UZS so'm)
Vanuatu (VUV Vt)
Vatican City (EUR €)
Venezuela (USD $)
Vietnam (VND ₫)
Wallis & Futuna (XPF Fr)
Western Sahara (MAD د.م.)
Yemen (YER ﷼)
Zambia (USD $)
Zimbabwe (USD $)
English
Ashlyn Mae Photography (formerly Bellevue Avenue)
Cart 0
  • Home
  • Shop
    • Shop by Category
      • Overlays
      • Photoshop Actions
      • Textures
      • Digital Backgrounds
      • Peek-Through Overlays
      • Sky and Cloud Overlays
      • Photoshop Tints
      • Courses
      • FREE
    • Shop by Season
      • Autumn Editing Tools
      • Winter Editing Tools
      • Spring Editing Tools
      • Summer Editing Tools
    • Shop Bundles
      • Actions Bundle
      • Overlays Bundle
      • Textures Bundle
      • Tints Bundle
      • Sky & Clouds Bundle
      • Digital Backgrounds Bundle

      • Courses
      • SALE
      • Gift Cards
    Valentines Day Goodies!

    Valentines Day Goodies!

    Shop now
  • Tutorials
  • Courses
  • Portfolio & Shoots
    • Portfolio
    • Photo Sessions
    • Mentoring
  • Coupons & Sales
    • Current Coupons
    • Current Sales
  • Installation
    • Start Here
      • Quick Start Guide
    • Actions & Brushes
      • How to Open Your ZIP file
      • How to Install Photoshop Actions
      • How to Install Photoshop Elements Actions
      • How to Install Photoshop Brushes
      • Button Mode Tutorial
    • Textures & Overlays
      • How to Install Textures & Overlays (CS/CC)
      • How to Install Textures & Overlays (PSE)
      • How to Install Textures & Overlays (On1 Plugin)
      • How to Create Libraries in Photoshop

  • Support
    • Gift Cards
    • Compatibility
    • Troubleshooting
    • Meet Ashlyn
    • Blog
    • Contact Us
    • Search Our Store
My Account
Log in Register
Ashlyn Mae Photography (formerly Bellevue Avenue)
Account Cart 0
  • Home
  • Shop
    • Shop by Category
      • Overlays
      • Photoshop Actions
      • Textures
      • Digital Backgrounds
      • Peek-Through Overlays
      • Sky and Cloud Overlays
      • Photoshop Tints
      • Courses
      • FREE
    • Shop by Season
      • Autumn Editing Tools
      • Winter Editing Tools
      • Spring Editing Tools
      • Summer Editing Tools
    • Shop Bundles
      • Actions Bundle
      • Overlays Bundle
      • Textures Bundle
      • Tints Bundle
      • Sky & Clouds Bundle
      • Digital Backgrounds Bundle

      • Courses
      • SALE
      • Gift Cards
    Valentines Day Goodies!

    Valentines Day Goodies!

    Shop now
  • Tutorials
  • Courses
  • Portfolio & Shoots
    • Portfolio
    • Photo Sessions
    • Mentoring
  • Coupons & Sales
    • Current Coupons
    • Current Sales
  • Installation
    • Start Here
      • Quick Start Guide
    • Actions & Brushes
      • How to Open Your ZIP file
      • How to Install Photoshop Actions
      • How to Install Photoshop Elements Actions
      • How to Install Photoshop Brushes
      • Button Mode Tutorial
    • Textures & Overlays
      • How to Install Textures & Overlays (CS/CC)
      • How to Install Textures & Overlays (PSE)
      • How to Install Textures & Overlays (On1 Plugin)
      • How to Create Libraries in Photoshop

  • Support
    • Gift Cards
    • Compatibility
    • Troubleshooting
    • Meet Ashlyn
    • Blog
    • Contact Us
    • Search Our Store

Search our store

Ashlyn Mae Photography (formerly Bellevue Avenue)
Account Cart 0
Popular Searches:
Resplendent Retouch Overlays
Blog

11 Tips for Shooting & Editing During the Golden Hour

by Bellevue Avenue on Feb 13, 2017
11 Tips for Shooting & Editing During the Golden Hour

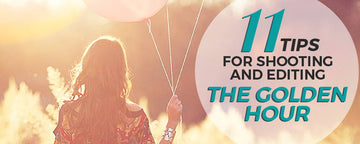
First of all, what is the "Golden Hour" & Why Is It Awesome?

The Golden Hour (which is sometimes called, the Magic Hour), is the short period of time (usually about an hour) directly after sunrise or before sunset when the sun is low on the horizon, creating warm hues and flattering, soft light. Unlike the remainder of the day (when the sun is harsh and bright), the light during the Golden Hour is soft and even. During the Golden Hour, it's easier to achieve a greater dynamic range (the ability to capture highlights and shadows without blowing or clipping them) in your images, as well as to capture gorgeous, glowing light and warm hues. It's also a perfect time to catch lovely lens flares and magical rim lighting! However, making the most of this short window of time in the day can take practice. We're going to share with you our Top 11 Tips for Shooting & Editing During the Golden Hour!

Here are 11 Tips for Shooting & Editing the Golden Hour!


1

Use a good Golden Hour calculator so that you know your window of time

1

Use a good Golden Hour calculator so that you know your window of time

During the Golden Hour, the sun is moving very quickly, and light diminishes before you realize it! Also, the closer you are to the equator, the smaller window of "Golden Hour" time you have to work with, so you need to prepare ahead of time! Calculate and plan for your "Golden Hour" window, by the following helpful calculator:

  • Sunrise and Sunset Calculator


I generally like to shoot during the 2 hours before sunset as well as about 15 minutes after the sun dips below the horizon.  

2

Shoot With a Wide Aperture

2

Shoot With a Wide Aperture

As the sun dips lower in the sky, and you get that gorgeous soft glow that is so coveted during the Golden Hour, you begin to have less light to work with. To take advantage of the available light, shoot with a wide aperture (from 1.2-4.0). This will allow the maximum amount of light into your camera and lengthen the amount of time you are able to shoot when available light is quickly fading.

Q1-BlogPost3-2
3

White balance on "Cloudy" for a warm glow

3

White balance on "Cloudy" for a warm glow

Set your white balance to "cloudy" to emphasize the warm, creamy glow of the Golden Hour.

Q1-BlogPost3-3
4

Use a reflector to retain detail

4

Use a reflector to retain detail

When shooting during Golden Hour, it's easy to lose clarity and details - particularly when you are backlighting to create beautiful rim light. To retain detail, and cut down on haze or dull front-lighting, use a reflector to bounce light back into your subject's face.

Q1-BlogPost3-4
5

Find a large, open location so that trees don't prematurely end your golden hour

5

Find a large, open location so that trees don't prematurely end your golden hour

If you are shooting among trees, you will find that your Golden Hour window will be prematurely cut short as the sun drops below the tree line. In order to use as much of the Golden Hour possible, find an open field to shoot in, where you can get the most light possible before the sun disappears.

Q1-BlogPost3-9
6

Achieve haze by shooting in the open light. Cut haze by standing in a shadow while you shoot

6

Achieve haze by shooting in the open light. Cut haze by standing in a shadow while you shoot

Both techniques are gorgeous, but you should learn how to utilize both. In order to achieve a soft wash of haze over your image, allow the sun to stream into your lens (as seen in the image on the left below). For a crisper, clearer backlit image, try standing in a shadow or using a lens hood to cut down on haze (as seen in the image on the right below).

Q1-BlogPost3-8
7

Beware of clouds

7

Beware of clouds

Clouds have their time and place for creating particular looks or image ambience, but if you're going for the warm, sunlight beauty of the Golden Hour, beware! Clouds can shave off 20-30 minutes worth of your Golden Hour time slot. If the forecast is cloudy, shoot earlier in the day.

Sad-Cloud
8

Utilize Front Lighting

8

Utilize Front Lighting

Try facing your subject toward the sun to allow the warm light to fall evenly across their face.

20140814-IMG_7797B
9

Utilize Back Light Glow

9

Utilize Back Light Glow

Place your subject between you and the sun to allow the light to stream around your subject creating a gorgeous, magical glow.  

Q1-BlogPost3-1
10

Utilize Rim Lighting

10

Utilize Rim Lighting

There are two ways to do this.

First: wait until the sun dips below the horizon or the trees to capture a beautifully soft, yet definable rim light.

Q1-BlogPost3-5

Second: start when the sun is a little higher in the sky, and look for pockets of light. Place your subject in the pocket of light to create a stronger (and quite magical) rim light.

Q1-BlogPost3-7
11

Editing Golden Hour Images

11

Editing Golden Hour Images

Here is a step-by-step edit of an image shot during Golden Hour using our Resplendent Collection Photoshop Actions (which I like to use to speed up my workflow and achieve looks that otherwise are more difficult to achieve by hand):

STEP 1:

Run the "Elixir" foundation (which runs a number of "foundational" steps to clean up, fix exposure, at clarity, color saturation and more)

GOLDENHOUR-EDIT-STEP1

STEP 2:

Run the "Whipped Cream" Sun Burst action to emphasize the creamy glow of light.

GOLDENHOUR-EDIT-STEP2

STEP 3:

Run the "Wheat" Peek-Through Action to create the illusion of shooting through foreground wheat to emphasize depth in the image.

GOLDENHOUR-EDIT-STEP3

Final Edit:

And here's the Final Edit (Before & After) of the image:

20151128-IMG_8987-STEP1
20151128-IMG_8987-STEP4

Being able to quickly edit Golden Hour images, or any image for that matter, is crucial to my workflow, which is why I love using Photoshop Actions.

11 Tips for Shooting & Editing
The Golden Hour (Cheat Sheet)

Don't forget any of these tips! Download and print our 11 Tips for Shooting & Editing the Golden Hour Cheat Sheet!

By entering your email, you are subscribing to Bellevue Avenue's personal and promotional marketing email list. If you are a member of the European Union, in the first email, you will be given the option to opt-in to our regular marketing emails after the launch sequence is over. If you choose not to, you will not receive any more marketing or promotional emails after this sequence is complete.

Tags: Photography Tips, Photoshoot Ideas
Previous
9 Tips for Tack Sharp Photos (+ 2 FREE Sharpening Photoshop Actions! )
Next
TUTORIAL : How to Edit Your Autumn Images with the Daily Fresh Blend Photoshop Actions

Related Articles

Understanding DSLR Priority Modes

Understanding DSLR Priority Modes

Recipes: Pumpkin Spice Autumn Actions

Recipes: Pumpkin Spice Autumn Actions

7 Quick Tips for Newbies to Instantly Improve Your Photography!

7 Quick Tips for Newbies to Instantly Improve Your Photography!

TUTORIAL : How to Edit Your Autumn Images with the Daily Fresh Blend Photoshop Actions

TUTORIAL : How to Edit Your Autumn Images with the Daily Fresh Blend Photoshop Actions

Leave a Comment

Your email address will not be published.

Tags

  • Autumn
  • Fall
  • Photography
  • Photography Tips
  • Photoshoot Ideas
  • Tutorials and Editing

Instagram

Info

  • Shop
  • About
  • Blog
  • Newsletter
  • Privacy Policy
  • Terms & Conditions
  • Return Policy

Support

  • Installation
  • Compatibility
  • Video Tutorials
  • Contact Us
  • FAQ

Newsletter

Join our VIP list for 5 FREE Essential Brush-On Photoshop Actions + inspiration, new products & discounts!

© ASHLYN MAE PHOTOGRAPHY
Cart 0

Confirm your age

Are you 18 years old or older?

Come back when you're older

Sorry, the content of this store can't be seen by a younger audience. Come back when you're older.

Special Offer Just for You!

You’ve added a product to your cart - now unlock an exclusive deal! Grab this offer before you check out

$26.89

Add to cart
No thanks

Do not show this again

Powered by Salepify App

1

Add to cart
Remove all

Powered by Salepify App